

gcp iot 使用
By: Edward Krueger and Douglas Franklin.
作者: 爱德华·克鲁格 ( Edward Krueger)和道格拉斯·富兰克林 ( Douglas Franklin) 。
Building prototypes with the Streamlit framework is simple, at least to get things running on your own computer. Sharing with a broader audience is more complicated.
使用Streamlit框架构建原型很简单,至少可以使事情在您自己的计算机上运行。 与更多的受众共享更加复杂。
Streamlit gives us the ability to create clean apps with minimal effort and no cost. The app we use here is very simple, as this article will focus on deployment. We are going to deploy a Streamlit app to Google cloud platform compute instance following the steps laid out in this article.
Streamlit使我们能够以最小的工作量和免费的成本创建干净的应用程序。 我们在这里使用的应用程序非常简单,因为本文将重点介绍部署。 我们将按照本文列出的步骤,将Streamlit应用程序部署到Google云平台计算实例。
Here is a link to the GitHub repository with our code for the project. Note that we use Pipenv to manage our dependencies.
这是带有我们项目代码的GitHub存储库的链接。 请注意,我们使用Pipenv来管理我们的依赖项。
什么是Streamlit? (What is Streamlit?)
Streamlit is a free and open-source app framework that presents an easy way for data scientists and machine learning engineers to create great Python apps quickly. Streamlit’s opinioned nature makes building frontends easy. Lastly, Streamlit can make experimentation and production of data apps and machine learning analysis easier to do and to iterate on.
Streamlit是一个免费的开源应用程序框架 呈现一个 数据科学家和机器学习工程师快速创建出色的Python应用程序的简便方法。 Streamlit自以为是的性质使构建前端变得容易。 最后,Streamlit可以使数据应用程序的实验和生产以及机器学习分析更容易进行和迭代。
Check out their work on GitHub.
查看他们在GitHub上的工作。
Docker和我们的Dockerfile (Docker and Our Dockerfile)
Docker is the best way to put apps into production. Docker uses a Dockerfile to build a container. The built container is stored in Google Container Registry, where it can be deployed. Docker containers can be built locally and will run on any system running Docker.
Docker是将应用程序投入生产的最佳方式。 Docker使用Dockerfile来构建容器。 生成的容器存储在Google容器注册表中,可以在其中进行部署。 Docker容器可以在本地构建,并且可以在运行Docker的任何系统上运行。
Here is the Dockerfile we used for this project:
这是我们用于该项目的Dockerfile:
FROM python:3.7-slim
COPY requirements.txt ./requirements.txt
RUN pip install -r requirements.txt
ENV APP_HOME /app
WORKDIR $APP_HOME
COPY . ./
CMD streamlit run app/app.py --server.port $PORT
The first line of our Dockerfile begins with FROM. This is where we import our OS or programming language.
Dockerfile的第一行以FROM.开头FROM. 这是我们导入操作系统或编程语言的地方。
The next two lines involve setting up the environment and executing it on the server. The COPY line makes the local file, requirements.txt, available in the docker container. The RUN command can be followed with any bash code you would like executed. We use RUN to install our dependencies. ThenENV, sets our environment variable ENV to APP_HOME / app . This mimics the structure of our project directories, letting Docker know where our app is.
接下来的两行涉及设置环境并在服务器上执行环境。 COPY本地文件requirements.txt在docker容器中可用。 您可以在RUN命令后跟随您要执行的任何bash代码。 我们使用RUN来安装我们的依赖项。 然后, ENV,将我们的环境变量ENV为APP_HOME / app 。 这模仿了项目目录的结构,让Docker知道我们的应用程序在哪里。
These lines are part of the Python cloud platform structure and you can read more about them in Google’s cloud documentation.
这些行是Python云平台结构的一部分,您可以在Google的云文档中了解有关它们的更多信息。
The WORKDIR line sets our working directory to $APP_HOME. Then, the COPY line makes the remaining local files available in the docker container.
WORKDIR行将我们的工作目录设置为$APP_HOME 。 然后, COPY其余本地文件在Docker容器中可用。
Our final line in the Dockerfile runs our app at $PORT.
Dockerfile中的最后一行在$PORT.运行我们的应用程序$PORT.
使用Docker构建和运行 (Build and Run with Docker)
Here we will explain how to build our container with Docker. Be aware that our Dockerfile is located in the backend directory.
在这里,我们将说明如何使用Docker构建容器。 请注意,我们的Dockerfile位于backend目录中。
-
Change into
backenddirectory.转到
backend目录。 -
Build with
docker build . -t streamlit-app使用
docker build . -t streamlit-appdocker build . -t streamlit-app

The docker build command treats each line of your Dockerfile as a ‘Step’ and provides a terminal output indicating when each step is run, as seen above.
docker docker build命令将Dockerfile的每一行都视为“步骤”,并提供终端输出,指示何时运行每个步骤,如上所示。
Now that our container is built on our VM, we can run our Streamlit app.
现在,我们的容器已建立在我们的VM上,我们可以运行Streamlit应用程序了。
-
Run with
docker run -p 80:8080 -e PORT=8080 streamlit-app使用
docker run -p 80:8080 -e PORT=8080 streamlit-app
Note: This will run the app on port 8080 inside the container and port 80 outside of the container. To reference it outside of the container, the URL is http://localhost/
注意:这将在容器内部的端口8080和容器外部的端口80上运行该应用程序。 要在容器外部引用它,URL是http://localhost/
You may receive an error that looks like this.
您可能会收到看起来像这样的错误。

If this is the case, alter the internal port 80 to another number, 85 for example, and run docker run -p 85:8080 -e PORT=8080 streamlit-app.
在这种情况下,请将内部端口80更改为另一个数字,例如85 ,然后运行docker run -p 85:8080 -e PORT=8080 streamlit-app 。

部署到GCP计算引擎 (Deploy to GCP Compute Engine)
If you are developing locally you will need to install the Cloud Software Development Kit CLI tools.
如果您是在本地进行开发,则需要安装Cloud Software Development Kit CLI工具。
If you are developing on a cloud machine it is likely already configured with these tools. Open a terminal and enter these commands.
如果您在云计算机上进行开发,则可能已经使用这些工具进行了配置。 打开终端并输入以下命令。
-
Run
gcloud initto select your account and project运行
gcloud init选择您的帐户和项目
This will prompt you several times to respond to prompts in the terminal to select, project and Virtual Machine (VM).
这将提示您多次以响应终端中的提示,以选择,投影和虚拟机(VM)。
-
Run
export PROJECT=$(gcloud config get-value project)to get and save your project id.运行
export PROJECT=$(gcloud config get-value project)以获取并保存您的项目ID。 -
Run
export GCR_TAG=gcr.io/$PROJECT/my-appto get the GCR tag.运行
export GCR_TAG=gcr.io/$PROJECT/my-app以获取GCR标签。
This allows us to reference GCR_TAG as an environmental variable for reuse later.
这使我们可以将GCR_TAG引用为环境变量,以备后用。
-
Run
gcloud builds submit --tag $GCR_TAGto submit the build to GCP Cloud Build.运行
gcloud builds submit --tag $GCR_TAG将gcloud builds submit --tag $GCR_TAG到GCP Cloud Build。

This builds our container on another machine in cloud build. Once this build is complete, our container is available in Google Container Registry (GCR) with the tag we’ve specified.
这将我们的容器构建在云构建中的另一台机器上。 构建完成后,我们的容器即可在Google容器注册表(GCR)中使用 加上我们指定的标签
-
Run
echo $GCR_TAGto see the GCR tag.运行
echo $GCR_TAG以查看GCR标签。
Now to deploy our dockerized app to a VM, we follow these steps.
现在要将dockerized应用程序部署到VM,请按照以下步骤操作。
- Go to “Compute Engine” in the GCP UI and select “CREATE INSTANCE.” 在GCP用户界面中转到“计算引擎”,然后选择“创建实例”。

- In the options, select the checkbox “Deploy a container image to this VM instance.” 在选项中,选中“将容器映像部署到此VM实例”复选框。
- Paste in the GCR tag in the “Container Image” field. 在“容器图像”字段中粘贴GCR标签。
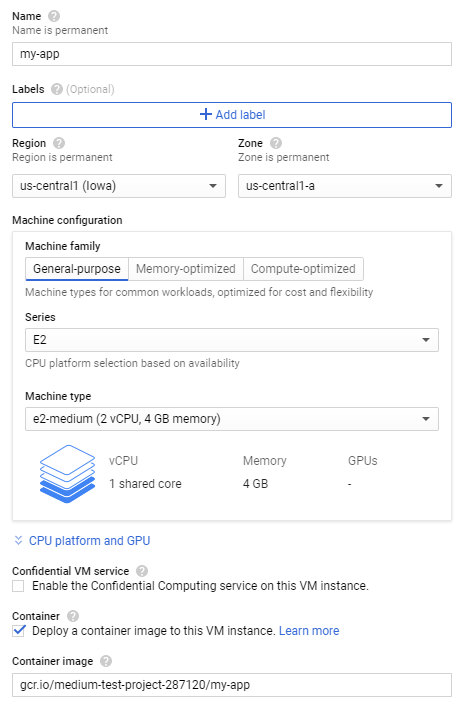
To publicly deploy, select “Allow HTTP traffic.”
要公开部署,请选择“允许HTTP流量”。
- Click “Create.” 点击“创建”。
-
Run
export GCR_TAG=<GCR TAG>.运行
export GCR_TAG=<GCR TAG>。
Be sure to replace GCR_TAG with your tag.
确保用您的标签替换GCR_TAG 。
-
Run
docker run -p 80:8080 -e PORT=8080 $GCR_TAG.运行
docker run -p 80:8080 -e PORT=8080 $GCR_TAG。
You shouldn’t run into any port errors on the fresh VM. If you do be sure to kill the process so you can maintain 80 as the default port. Otherwise, your localhost address will be the internal port you specified.
您不应该在新的VM上遇到任何端口错误。 如果您确定要终止该进程,则可以将80保留为默认端口。 否则,您的本地主机地址将是您指定的内部端口。
On success, you will see two URLs populate your terminal.
成功后,您将看到两个URL填充您的终端。

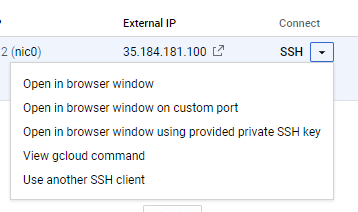
Now, use the GUI and click the dropdown under ‘connect’ and select ‘Open in browser window.’
现在,使用GUI并单击“连接”下的下拉菜单,然后选择“在浏览器窗口中打开”。
This will open a new terminal seen below. We once again need our GCR_TAG and can retrieve it with the command docker image ls .
这将打开一个新的终端,如下所示。 我们再次需要我们的GCR_TAG并可以使用命令GCR_TAG docker image ls检索它。
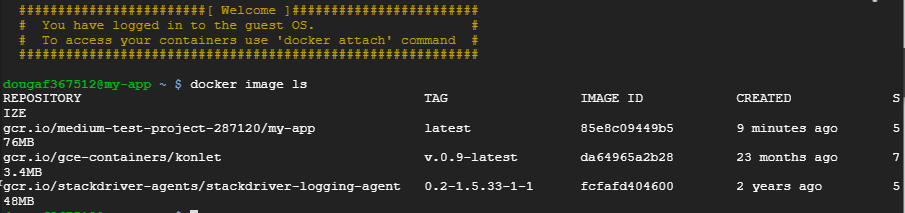
Once we have our GCR_TAG we save it using export and then rerun our app with the line docker run -p 80:8080 -e PORT=8080 $GCR_TAG.
有了GCR_TAG我们使用export保存它,然后使用GCR_TAG docker run -p 80:8080 -e PORT=8080 $GCR_TAG行重新运行我们的应用程序。

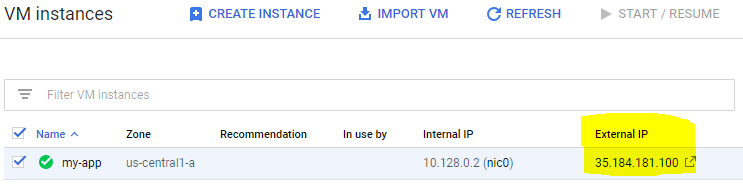
Note that we cannot find our app at the URL displayed in our terminal. To see our app running, we will use the GUI and find the URL displayed there.
请注意,我们无法在终端中显示的URL上找到我们的应用。 要查看我们的应用程序正在运行,我们将使用GUI并找到在那里显示的URL。
If you visit the URL, you will see your app! Be aware this is publically accessible.
如果您访问URL,您将看到您的应用程序! 请注意,这是公开可用的。
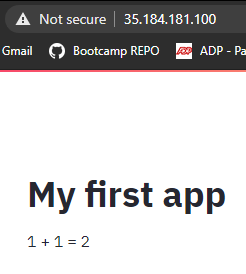
Note that this is ‘Not secure’ meaning there is no HTTPS handshake happening. If a website is non-secure, any information a user inputs on the page (e.g., name, address, credit card details) is not protected and can be easily stolen. However, on a secure website, the code is encrypted so any sensitive information is much harder to discover.
请注意,这是“不安全的”,这意味着没有HTTPS握手发生。 如果网站是不安全的,则用户在页面上输入的任何信息(例如,姓名,地址,信用卡详细信息)都不会受到保护,并且很容易被盗。 但是,在安全的网站上,代码已加密,因此任何敏感信息都很难发现。
Be sure to shut down your instances when you are done with them as they only bill you for runtime.
完成使用实例后,请确保关闭它们,因为它们只会向您收取运行时间的费用。
结论 (Conclusion)
Now we know how to Dockerize a streamlit app and deploy it to GCP. Streamlit is great for quick POC mockups and internal dashboards and now we have a way to test our Streamlit apps in the cloud!
现在,我们知道如何对简化的应用程序进行Docker化并将其部署到GCP。 Streamlit非常适合快速POC样机和内部仪表板,现在我们有了一种在云中测试Streamlit应用程序的方法!
Thank you for reading! Can you deploy a Streamlit App?
感谢您的阅读! 您可以部署Streamlit应用程序吗?
gcp iot 使用


 已为社区贡献1条内容

所有评论(0)