2024年《大数据技术基础》实验1-实验7_大数据技术基础实验一(1),掌握这个提升路径,
yncho。

网上学习资料一大堆,但如果学到的知识不成体系,遇到问题时只是浅尝辄止,不再深入研究,那么很难做到真正的技术提升。
一个人可以走的很快,但一群人才能走的更远!不论你是正从事IT行业的老鸟或是对IT行业感兴趣的新人,都欢迎加入我们的的圈子(技术交流、学习资源、职场吐槽、大厂内推、面试辅导),让我们一起学习成长!
    else
        printFile ${i}
    fi
done
}
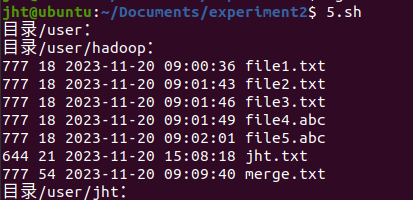
printFile /user
结果如下:
6. 提供一个 HDFS
内的文件的路径,对该文件进行创建和删除操作。如果文件所在目录不存在,则自动创建目录。
报错1:mkdir: Cannot create directory /user/hadoop/jht2. Name node
is in safe mode.
关闭安全模式,hdfs dfsadmin -safemode leave
#!/bin/bash
createFile(){
local filename= 1 l o c a l d i r n a m e = 1 local dirname= 1localdirname=(dirname “$filename”)
hdfs dfs -mkdir -p ${dirname}
hdfs dfs -touch ${filename}
}
createFile /user/hadoop/jht/newFile1.txt
createFile /user/hadoop/jht2/newFile2.txt
createFile /user/hadoop/jht3/newFile3.txt
结果如下:
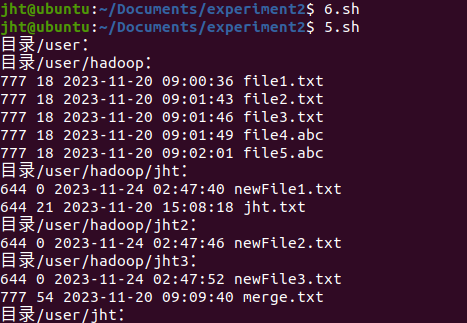
可以看到三个文件已经创建完毕了。
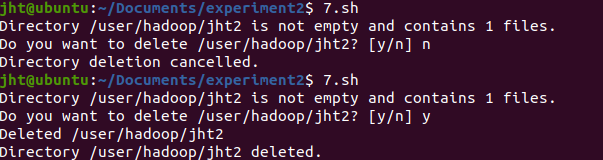
7. 提供一个 HDFS
的目录的路径,对该目录进行创建和删除操作。创建目录时,如果目录文件所在目录不存在则自动创建相应目录;删除目录时,由用户指定当该目录不为空时是否还删除该目录。
#!/bin/bash
createDir(){
local dirname=$1
hdfs dfs -mkdir -p ${dirname}
}
deleteDir(){
local dirname= 1 i f h d f s d f s − t e s t − d " 1 if hdfs dfs -test -d " 1ifhdfsdfs−test−d"{dirname}“; then
num_files= ( h d f s d f s − c o u n t − h " (hdfs dfs -count -h " (hdfsdfs−count−h"{dirname}” | awk ‘{print
$2}’)
if [ n u m f i l e s − e q 0 ] ; t h e n h d f s d f s − r m − r " {num_files} -eq 0 ]; then hdfs dfs -rm -r " numfiles−eq0];thenhdfsdfs−rm−r"{dirname}"
echo “Directory ${dirname} deleted.”
else
echo “Directory ${dirname} is not empty and contains
${num_files} files.”
read -p “Do you want to delete d i r n a m e ? [ y / n ] " c h o i c e c a s e " {dirname}? [y/n] " choice case " dirname?[y/n]"choicecase"choice” in
y|Y ) hdfs dfs -rm -r “${dirname}” && echo “Directory
${dirname} deleted.”;;
n|N ) echo “Directory deletion cancelled.”;;
* ) echo “Invalid option. Directory deletion
cancelled.”;;
esac
fi
else
echo “Directory ${dirname} does not exist in HDFS.”
fi
}
createDir /user/hadoop/jht3
deleteDir /user/hadoop/jht2
结果如下:
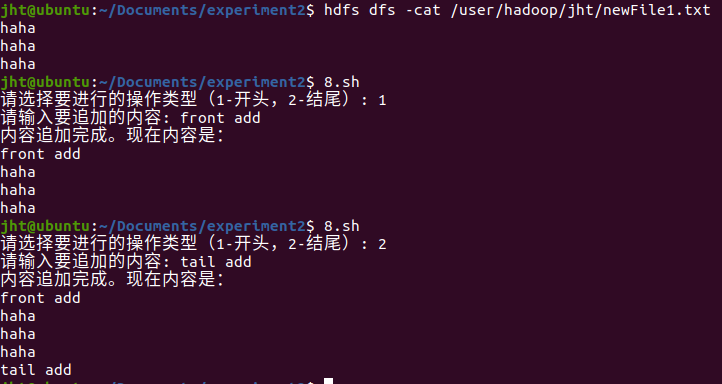
8. 向HDFS中指定的文件追加内容,由用户指定内容追加到原有文件的开头或结尾。
#!/bin/bash
获取用户输入的操作类型和要追加的内容
read -p “请选择要进行的操作类型(1-开头,2-结尾): " operation
read -p “请输入要追加的内容: " content
hdfs_path=”/user/hadoop/jht/newFile1.txt”
temp_file_path=“/home/jht/Documents/temp.txt”
下载HDFS文件到本地临时文件
hdfs dfs -get -f “ h d f s _ p a t h " " hdfs\_path" " hdfs_path""temp_file_path”
根据操作类型,将内容追加到临时文件的开头或结尾
if [ “ o p e r a t i o n " = " 1 " ] ; t h e n e c h o " operation" = "1" ]; then echo " operation"="1"];thenecho"content” > “ t e m p _ f i l e _ p a t h . t m p " c a t " temp\_file\_path.tmp" cat " temp_file_path.tmp"cat"temp_file_path” >> “ t e m p _ f i l e _ p a t h . t m p " c p − f " temp\_file\_path.tmp" cp -f " temp_file_path.tmp"cp−f"temp_file_path.tmp” “ t e m p _ f i l e _ p a t h " e l i f [ " temp\_file\_path" elif [ " temp_file_path"elif["operation” = “2” ]; then
echo “ c o n t e n t " > > " content" >> " content">>"temp_file_path”
fi
将修改后的临时文件上传回HDFS,并删除本地临时文件
hdfs dfs -put -f “ t e m p _ f i l e _ p a t h " " temp\_file\_path" " temp_file_path""hdfs_path”
rm “ t e m p _ f i l e _ p a t h " " temp\_file\_path" " temp_file_path""temp_file_path.tmp”
echo “内容追加完成。现在内容是:”
hdfs dfs -cat “$hdfs_path”
结果如下:
9. 删除HDFS中指定的文件。
#!/bin/bash
hdfs_path=“/user/hadoop/jht2/newFile2.txt”
hdfs dfs -rm $hdfs_path
结果如下:

10. 在HDFS中将文件从源路径移动到目的路径。
#!/bin/bash
source_path=“/user/hadoop/jht/newFile1.txt”
target_path=“/user/hadoop/jht2/newFile2.txt”
hdfs dfs -mv $source_path $target_path
结果如下:

(2)编程实现一个类"MyFSDataInputStream",该类继承"org.apache.hadoop.fs.FSDataInput
Stream",要求如下。
①
实现按行读取HDFS中指定文件的方法"readLine()",如果读到文件末尾,则返回空,否则返回文件一行的文本。
②
实现缓存功能,即利用"MyFSDataInputStream"读取若干字节数据时,首先查找缓存,如果缓存中有所需数据,则直接由缓存提供,否则向HDFS读取数据。
import java.io.BufferedReader;
import java.io.IOException;
import java.io.InputStreamReader;
import org.apache.hadoop.conf.Configuration;
import org.apache.hadoop.fs.FSDataInputStream;
import org.apache.hadoop.fs.FileSystem;
import org.apache.hadoop.fs.Path;
public class MyFSDataInputStream extends FSDataInputStream {
public MyFSDataInputStream(FSDataInputStream in) {
super(in);
}
public static void readFile(String filepath) throws IOException {
BufferedReader reader = null;
StringBuilder sb = new StringBuilder();
try {
// 创建Hadoop配置对象
Configuration conf = new Configuration();
// 设置Hadoop集群的URI
conf.set(“fs.defaultFS”, “hdfs://localhost:9000”);
FileSystem fileSystem = FileSystem.get(conf);
Path path = new Path(filepath);
reader = new BufferedReader(new
InputStreamReader(fileSystem.open(path)));
String line;
while ((line = reader.readLine()) != null) {
System.out.println(line);
}
} finally {
if (reader != null) {
reader.close();
}
}
}
public static void isConnected(String filePath) {
try {
// 创建Hadoop配置对象
Configuration conf = new Configuration();
// 设置Hadoop集群的URI
conf.set(“fs.defaultFS”, “hdfs://localhost:9000”);
// 创建Hadoop文件系统对象
FileSystem fs = FileSystem.get(conf);
// 执行具体的Hadoop文件操作
Path path = new Path(filePath);
boolean exists = fs.exists(path);
if (exists) {
System.out.println(filePath+“:File exists”);
} else {
System.out.println(filePath+“:File does not exist”);
}
// 关闭文件系统连接
fs.close();
} catch (Exception e) {
e.printStackTrace();
}
}
public static void main(String[] args) throws IOException {
String filePath = “/user/hadoop/jht2/newFile2.txt”;
// isConnected(filePath);
readFile(filePath);
}
}
结果如下:
先用isConnected测试一下,可以链接到Hadoop,并且可以正确检测到文件。
然后调用readFile,可以正确读取到文件内容。

3. 查看Java帮助手册或其他资料,用"java.net.URL"和"org.apache.hadoop.fs.FsURLStream
HandlerFactory"编程来输出HDFS中指定文件的文本到终端中。
import java.io.BufferedReader;
import java.io.InputStreamReader;
import java.net.URL;
import org.apache.hadoop.fs.FsUrlStreamHandlerFactory;
public class ReadHDFSFile {
public static void main(String[] args) throws Exception {
URL.setURLStreamHandlerFactory(new FsUrlStreamHandlerFactory());
URL hdfsUrl = new
URL(“hdfs://localhost:9000/user/hadoop/jht2/newFile2.txt”);
BufferedReader reader = new BufferedReader(new
InputStreamReader(hdfsUrl.openStream()));
String line;
while ((line = reader.readLine()) != null) {
System.out.println(line);
}
reader.close();
}
}
结果如下:
## 《大数据技术基础》实验报告3
#### 目的
(1)通过实验掌握基本的MapReduce编程方法。
(2)掌握用MapReduce解决一些常见数据处理问题的方法,包括数据去重、数据排序和数据挖掘等。
#### 二、实验平台
操作系统:Linux。
Hadoop版本:2.7.3或以上版本。
JDK版本:1.7或以上版本。
Java IDE:Eclipse/IDEA。
#### 三、实验要求
1. **编程实现文件合并和去重操作**
对于两个输入文件,即文件A和文件B,请编写MapReduce程序,对两个文件进行合并,并剔除其中重复的内容,得到一个新的输出文件C。下面是输入文件和输出文件的一个样例供参考。
2. **编程实现对输入文件的排序**
现在有多个输入文件,每个文件中的每行内容均为一个整数。要求读取所有文件中的整数,进行升序排序后,输出到一个新的文件中,输出的数据格式为每行两个整数,第一个整数为第二个整数的排序位次,第二个整数为原待排列的整数。
3. **对给定的表格进行信息挖掘**
下面给出一个child-parent的表格,要求挖掘其中的父子辈关系,给出祖孙辈关系的表格。
#### 实验内容
##### 1.编程实现文件合并和去重操作
对于两个输入文件,即文件A和文件B,请编写MapReduce程序,对两个文件进行合并,并剔除其中重复的内容,得到一个新的输出文件C。下面是输入文件和输出文件的一个样例供参考。
输入文件A的样例如下。
20150101 x
20150102 y
20150103 x
20150104 y
20150105 z
20150106 x
输入文件B的样例如下。
20150101 y
20150102 y
20150103 x
20150104 z
20150105 y
根据输入文件A和B合并得到的输出文件C的样例如下。
20150101 x
20150101 y
20150102 y
20150103 x
20150104 y
20150104 z
20150105 y
20150105 z
20150106 x
代码:
package EXP3;
import org.apache.hadoop.conf.Configuration;
import org.apache.hadoop.fs.Path;
import org.apache.hadoop.io.*;
import org.apache.hadoop.mapreduce.*;
import org.apache.hadoop.mapreduce.lib.input.FileInputFormat;
import org.apache.hadoop.mapreduce.lib.output.FileOutputFormat;
import org.apache.hadoop.mapreduce.Job;
import java.io.File;
import java.io.IOException;
public class DuplicateRemoval {
public static class DuplicateRemovalMapper extends Mapper<Object,
Text, Text, NullWritable> {
private Text word = new Text();
public void map(Object key, Text value, Context context) throws
IOException, InterruptedException {
System.out.println(“value:”+value);
word.set(value.toString());
context.write(word, NullWritable.get());
}
}
public static class DuplicateRemovalReducer extends Reducer<Text,
NullWritable, Text, NullWritable> {
public void reduce(Text key, Iterable values,
Context context) throws IOException, InterruptedException {
System.out.println(“key:”+key);
context.write(key, NullWritable.get());
}
}
public static void main(String[] args) throws Exception {
String path1=“/home/jht/Documents/experiment3/1a.txt”;
String path2=“/home/jht/Documents/experiment3/1b.txt”;
String path3=“/home/jht/Documents/experiment3/1c”;
File folder = new File(path3);
if (folder.exists())
folder.delete();
    Configuration conf = new Configuration();
    Job job = Job.getInstance(conf, "Duplicate Removal");
    job.setJarByClass(DuplicateRemoval.class);
    job.setMapperClass(DuplicateRemovalMapper.class);
    job.setReducerClass(DuplicateRemovalReducer.class);
    job.setOutputKeyClass(Text.class);
    job.setOutputValueClass(NullWritable.class);
    FileInputFormat.addInputPath(job, new Path(path1));
    FileInputFormat.addInputPath(job, new Path(path2));
    FileOutputFormat.setOutputPath(job, new Path(path3));
    System.exit(job.waitForCompletion(true) ? 0 : 1);
}
}
结果:

##### 2.编程实现对输入文件的排序
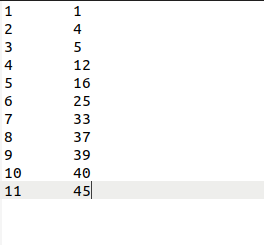
现在有多个输入文件,每个文件中的每行内容均为一个整数。要求读取所有文件中的整数,进行升序排序后,输出到一个新的文件中,输出的数据格式为每行两个整数,第一个整数为第二个整数的排序位次,第二个整数为原待排列的整数。下面是输入文件和输出文件的一个样例,供参考。
输入文件1的样例如下。
33
37
12
40
输入文件2的样例如下。
4
16
39
5
输入文件3的样例如下。
1
45
25
根据输入文件1、2和3得到的输出文件如下。
1 1
2 4
3 5
4 12
5 16
6 25
7 33
8 37
9 39
10 40
11 45
代码:
package EXP3;
import org.apache.hadoop.conf.Configuration;
import org.apache.hadoop.fs.Path;
import org.apache.hadoop.io.IntWritable;
import org.apache.hadoop.io.NullWritable;
import org.apache.hadoop.io.Text;
import org.apache.hadoop.mapreduce.Job;
import org.apache.hadoop.mapreduce.Mapper;
import org.apache.hadoop.mapreduce.Reducer;
import org.apache.hadoop.mapreduce.lib.input.FileInputFormat;
import org.apache.hadoop.mapreduce.lib.output.FileOutputFormat;
import java.io.File;
import java.io.IOException;
import static java.lang.System.exit;
public class IntegerSorting {
public static class SortMapper extends Mapper<Object, Text,
IntWritable, IntWritable> {
@Override
protected void map(Object key, Text value, Context context)
throws IOException, InterruptedException {
int keyNum = Integer.parseInt(value.toString());
System.out.println(“key:”+keyNum);
IntWritable theKey = new IntWritable(keyNum);
context.write(theKey,new IntWritable(1));
}
}
private static int count=0;
public static class SortReducer extends Reducer<IntWritable,
IntWritable, IntWritable, IntWritable> {
@Override
protected void reduce(IntWritable key, Iterable
values, Context context) throws IOException, InterruptedException {
count++;
IntWritable theKey = new IntWritable(count);
context.write(theKey, key);
}
}
public static void main(String[] args) throws Exception {
String path1=“/home/jht/Documents/experiment3/2a.txt”;
String path2=“/home/jht/Documents/experiment3/2b.txt”;
String path3=“/home/jht/Documents/experiment3/2c.txt”;
String path4=“/home/jht/Documents/experiment3/2d”;
Configuration conf = new Configuration();
Job job = Job.getInstance(conf, “Integer Sorting”);
job.setJarByClass(IntegerSorting.class);
job.setMapperClass(SortMapper.class);
job.setReducerClass(SortReducer.class);
job.setOutputKeyClass(IntWritable.class);
job.setOutputValueClass(IntWritable.class);
FileInputFormat.addInputPath(job, new Path(path1));
FileInputFormat.addInputPath(job, new Path(path2));
FileInputFormat.addInputPath(job, new Path(path3));
FileOutputFormat.setOutputPath(job, new Path(path4));
exit(job.waitForCompletion(true) ? 0 : 1);
}
}
结果如下:
##### 3.对给定的表格进行信息挖掘
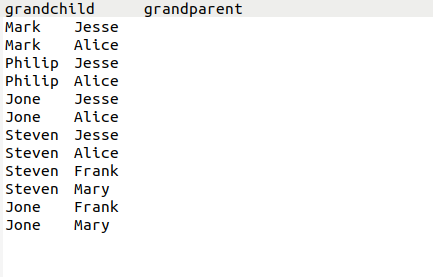
下面给出一个child-parent的表格,要求挖掘其中的父子辈关系,给出祖孙辈关系的表格。
输入文件内容如下。
child parent
Steven Lucy
Steven Jack
Jone Lucy
Jone Jack
Lucy Mary
Lucy Frank
Jack Alice
Jack Jesse
David Alice
David Jesse
Philip David
Philip Alma
Mark David
Mark Alma
输出文件内容如下。
grandchild grandparent
Steven Alice
Steven Jesse
Jone Alice
Jone Jesse
Steven Mary
Steven Frank
Jone Mary
Jone Frank
Philip Alice
Philip Jesse
Mark Alice
Mark Jesse
代码:
package EXP3;
import java.io.IOException;
import java.util.*;
import org.apache.hadoop.conf.Configuration;
import org.apache.hadoop.fs.Path;
import org.apache.hadoop.io.Text;
import org.apache.hadoop.mapreduce.Job;
import org.apache.hadoop.mapreduce.Mapper;
import org.apache.hadoop.mapreduce.Reducer;
import org.apache.hadoop.mapreduce.lib.input.FileInputFormat;
import org.apache.hadoop.mapreduce.lib.output.FileOutputFormat;
import static java.lang.System.exit;
public class ChildParent {
//Map将输入文件按照空格分割成child和parent,然后正序输出一次作为右表,反序输出一次作为左表,需要注意的是在输出的value中必须加上左右表区别标志
public static class Map extends Mapper<Object, Text, Text, Text>{
public void map(Object key, Text value, Context context) throws
IOException,InterruptedException{
String line = value.toString();
int i = 0;
while(line.charAt(i) != ’ ')
i++;
String child_name = line.substring(0,i);
String parent_name = line.substring(i+1);
if(child_name.compareTo(“child”) != 0 &&
!child_name.isEmpty() && !parent_name.isEmpty()){
context.write(new Text(parent_name), new
Text(“1+”+child_name));
context.write(new Text(child_name), new
Text(“2+”+parent_name));
}
}
}
public static boolean header = true;
public static class Reduce extends Reducer<Text, Text, Text,
Text>{
public void reduce(Text key, Iterable
context) throws IOException,InterruptedException{
if(header){
context.write(new Text(“grandchild”), new
Text(“grandparent”));
header = false;
}
System.out.println(“===”+key);
List grand_child = new
ArrayList<>(),grand_parent = new ArrayList<>();
for(Text value:values)
{
String record = value.toString();
char relation_type = record.charAt(0);
String name = record.substring(2);
if (relation_type == ‘1’)
grand_child.add(name);
else
grand_parent.add(name);
}
for(String child:grand_child)
{
for(String parent:grand_parent)
{
context.write(new Text(child),new Text(parent));
}
}
}
}
public static void main(String[] args) throws Exception{
String path1=“/home/jht/Documents/experiment3/3a.txt”;
String path2=“/home/jht/Documents/experiment3/3b”;
Configuration conf = new Configuration();
Job job = Job.getInstance(conf, “ChildParent”);
job.setJarByClass(ChildParent.class);
job.setMapperClass(Map.class);
job.setReducerClass(Reduce.class);
job.setOutputKeyClass(Text.class);
job.setOutputValueClass(Text.class);
FileInputFormat.addInputPath(job, new Path(path1));
FileOutputFormat.setOutputPath(job, new Path(path2));
exit(job.waitForCompletion(true) ? 0 : 1);
}
}
结果如下:
## 《大数据技术基础》实验报告4
#### 目的
(1)理解HBase在Hadoop体系结构中的角色。
(2)熟练使用HBase操作常用的Shell命令。
(3)熟悉HBase操作常用的Java API。
#### 二、实验平台
操作系统:Linux。
Hadoop版本:2.7.3或以上版本。
JDK版本:1.7或以上版本。
Java IDE:Eclipse/IDEA。
#### 三、实验要求
(1)编程实现以下指定功能,并用Hadoop提供的HBase
Shell命令完成相同的任务。
① 列出HBase所有表的相关信息,如表名、创建时间等。
② 在终端打印出指定表的所有记录数据。
③ 向已经创建好的表添加和删除指定的列族或列。
④ 清空指定表的所有记录数据。
⑤ 统计表的行数。
(2)现有以下关系型数据库中的表(见表4-20、表4-21和表4-22),要求将其转换为适合HBase存储的表并插入数据。


同时,请编程完成以下指定功能。
① createTable(String tableName, String[]fields)。
创建表,参数 tableName 为表的名称,字符串数组 fields
为存储记录各个域名称的数组。要求当HBase已经存在名为tableName的表的时候,先删除原有的表,再创建新的表。
② addRecord(String tableName, String row, String[]fields,
String[]values)。
向表tableName、行row(用S\_Name表示)和字符串数组fields指定的单元格中添加对应的数据
values。其中 fields
中每个元素如果对应的列族下还有相应的列限定符的话,用"columnFamily:column"表示。例如,同时向"Math"“Computer
Science”“English"3列添加成绩时,字符串数组fields为{“Score:Math”,“Score:Computer
Science”,“Score:English”},数组values存储这3门课的成绩。
③ scanColumn(String tableName, String column)。
浏览表 tableName 某一列的数据,如果某一行记录中该列数据不存在,则返回
null。要求当参数column为某一列族名称时,如果底下有若干个列限定符,则要列出每个列限定符代表的列的数据;当参数column为某一列具体名称(如"Score:Math”)时,只需要列出该列的数据。
④ modifyData(String tableName, String row, String column)。
修改表tableName,行row(可以用学生姓名S\_Name表示),列column指定的单元格的数据。
⑤ deleteRow(String tableName, String row)。
删除表tableName中row指定的行的记录。
#### 实验内容
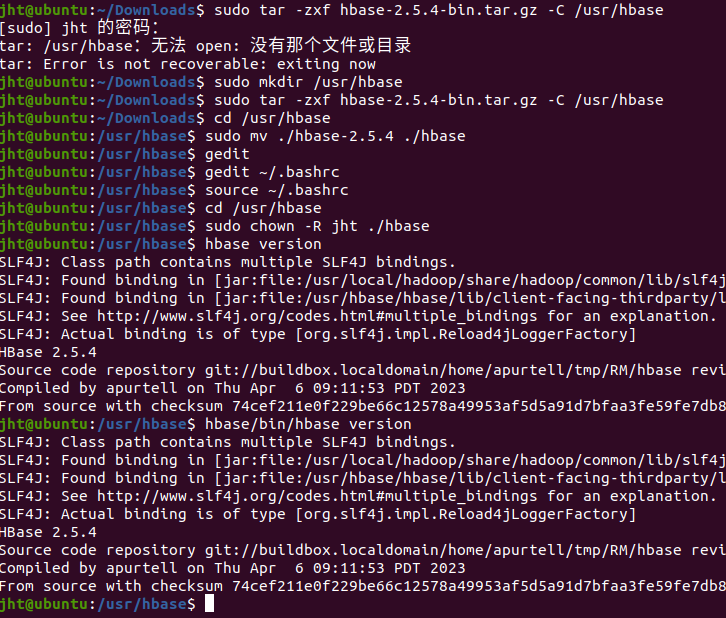
##### 4.1 安装hbase
下载安装包后,放置在documents文件夹下。解压到/usr/hbase文件夹。
sudo tar hbase-2.5.4-bin.tar.gz -C /usr/hbase
cd /usr/hbase
sudo mv ./hbase-2.5.4 ./hbase
下面把hbase目录权限赋予给jht用户
cd /usr/hbase
sudo chown -R jht./hbase
配置环境变量
gedit ~/.bashrc
export PATH=$PATH:/usr/hbase/hbase/bin
source ~/.bashrc
(后面为了方便,把hbase位置移动到了/usr/local文件夹下)
配置/usr/local/hbase/conf/hbase-env.sh
。配置JAVA环境变量,并添加配置HBASE\_MANAGES\_ZK为true,用vi命令打开并编辑hbase-env.sh,命令如下:
vim /usr/local/hbase/conf/hbase-env.sh
在里面添加:
export JAVA_HOME=/usr/lib/jvm/jdk1.8.0_371
export HBASE_MANAGES_ZK=true
配置/usr/local/hbase/conf/hbase-site.xml
 打开并编辑hbase-site.xml,命令如下:
vim /usr/local/hbase/conf/hbase-site.xml
在启动HBase前需要设置属性hbase.rootdir,用于指定HBase数据的存储位置,因为如果不设置的话,hbase.rootdir默认为/tmp/hbase-${user.name},这意味着每次重启系统都会丢失数据。此处设置为HBase安装目录下的hbase-tmp文件夹即(/usr/local/hbase/hbase-tmp),添加配置如下:
##### 4.2 测试运行


接下来测试运行。启动HBase。命令如下:
start-hbase.sh
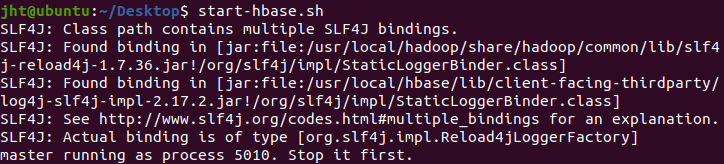 报错原因:路径中含有冲突的jar包,一个在hbase路径下另一个在hadoop路径下。 解决方法: 把hbase路径下的冲突jar包修改名称

可以看到,再次启动不会有报错提示了。
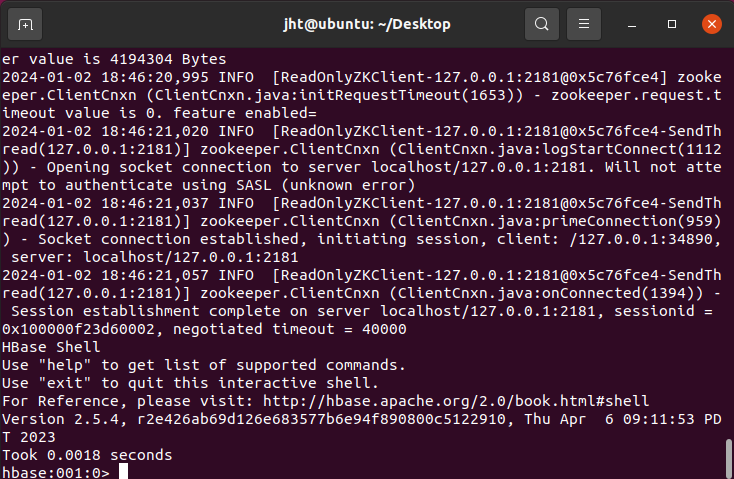
hbase shell
成功启动:
##### 4.3 任务一
###### 4.3.1 建表
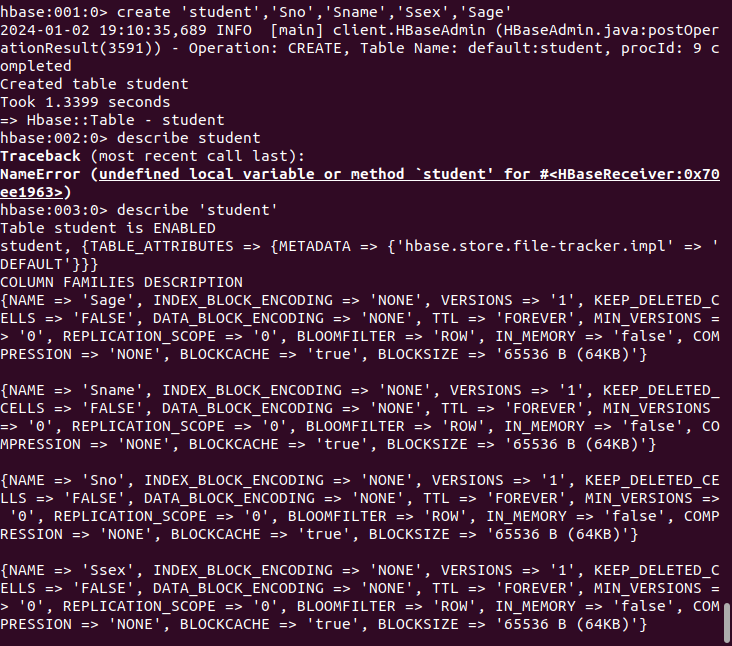
首先创建完所有的表,然后再执行任务一中的命令。
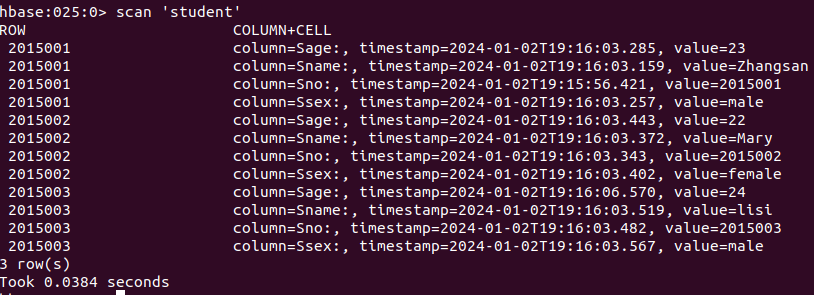
create ‘student’,‘Sno’,‘Sname’,‘Ssex’,‘Sage’
插入数据:
put ‘student’, ‘2015001’, ‘Sno’, ‘2015001’
put ‘student’, ‘2015001’, ‘Sname’, ‘Zhangsan’
put ‘student’, ‘2015001’, ‘Ssex’, ‘male’
put ‘student’, ‘2015001’, ‘Sage’, ‘23’
put ‘student’, ‘2015002’, ‘Sno’, ‘2015002’
put ‘student’, ‘2015002’, ‘Sname’, ‘Mary’
put ‘student’, ‘2015002’, ‘Ssex’, ‘female’
put ‘student’, ‘2015002’, ‘Sage’, ‘22’
put ‘student’, ‘2015003’, ‘Sno’, ‘2015003’
put ‘student’, ‘2015003’, ‘Sname’, ‘lisi’
put ‘student’, ‘2015003’, ‘Ssex’, ‘male’
put ‘student’, ‘2015003’, ‘Sage’, ‘24’

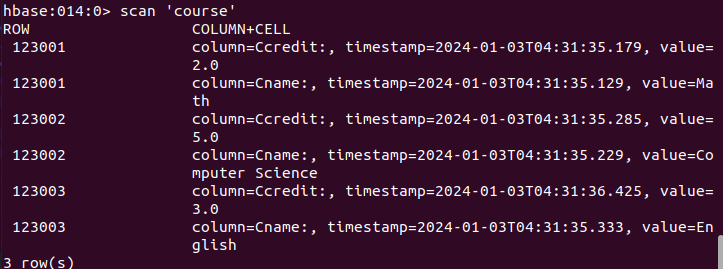
create ‘course’,‘Cno’,Cname’,‘Ccredit’
put ‘course’, ‘123001’, ‘Cname’, ‘Math’
put ‘course’, ‘123001’, ‘Ccredit’, ‘2.0’
put ‘course’, ‘123002’, ‘Cname’, ‘Computer Science’
put ‘course’, ‘123002’, ‘Ccredit’, ‘5.0’
put ‘course’, ‘123003’, ‘Cname’, ‘English’
put ‘course’, ‘123003’, ‘Ccredit’, ‘3.0’
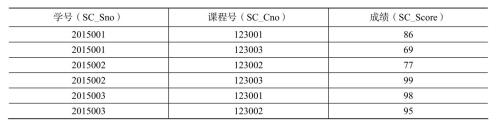
create ‘score’,‘SC_Sno’,‘SC_Cno’,‘SC_Score’
put ‘score’, ‘2015001’, ‘SC_Cno:123001’, ‘86’
put ‘score’, ‘2015001’, ‘SC_Cno:123003’, ‘69’
put ‘score’, ‘2015002’, ‘SC_Cno:123002’, ‘77’
put ‘score’, ‘2015002’, ‘SC_Cno:123003’, ‘99’
put ‘score’, ‘2015003’, ‘SC_Cno:123001’, ‘98’
put ‘score’, ‘2015003’, ‘SC_Cno:123002’, ‘95’

###### 4.3.2 HBase Shell命令实现任务
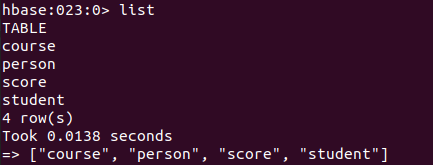
list
scan ‘student’
put ‘student’, ‘2015001’, ‘Sname’, ‘hahaha’


truncate ‘student’

count ‘student’

##### 4.4 任务二
###### 4.4.1 createTable
package hbase1;
import org.apache.hadoop.conf.Configuration;
import org.apache.hadoop.hbase.HBaseConfiguration;
import org.apache.hadoop.hbase.HColumnDescriptor;
import org.apache.hadoop.hbase.HTableDescriptor;
import org.apache.hadoop.hbase.TableName;
import org.apache.hadoop.hbase.client.Admin;
import org.apache.hadoop.hbase.client.Connection;
import org.apache.hadoop.hbase.client.ConnectionFactory;
import java.io.IOException;
public class CreateTable {
public static Configuration configuration;
public static Connection connection;
public static Admin admin;
public static void createTable(String tableName, String[] fields)
throws IOException {
init();
TableName tablename = TableName.valueOf(tableName);
if (admin.tableExists(tablename)) {
System.out.println(“table is exists!”);
admin.disableTable(tablename);
admin.deleteTable(tablename);
}
HTableDescriptor hTableDescriptor = new
HTableDescriptor(tablename);
for (String str : fields) {
HColumnDescriptor hColumnDescriptor = new
HColumnDescriptor(str);
hTableDescriptor.addFamily(hColumnDescriptor);
}
admin.createTable(hTableDescriptor);
close();
}
public static void init() {
configuration = HBaseConfiguration.create();
configuration.set(“hbase.rootdir”,
“hdfs://localhost:9000/hbase”);
try {
connection =
ConnectionFactory.createConnection(configuration);
admin = connection.getAdmin();
} catch (IOException e) {
e.printStackTrace();
}
}
public static void close() {
try {
if (admin != null) {
admin.close();
}
if (null != connection) {
connection.close();
}
} catch (IOException e) {
e.printStackTrace();
}
}
public static void main(String[] args) {
String[] fields = {“Score”};
try {
createTable(“person”, fields);
} catch (IOException e) {
e.printStackTrace();
}
}
}
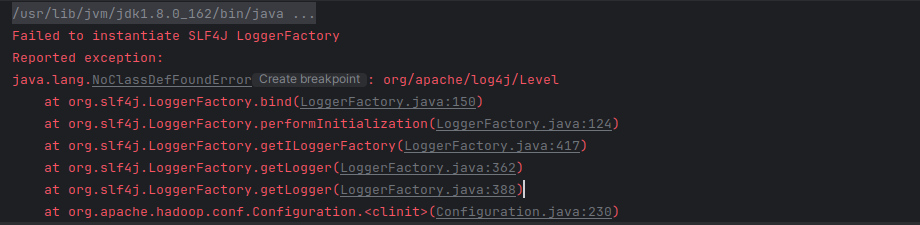
导入hbase和hadoop下常用的jar包,运行后报错:

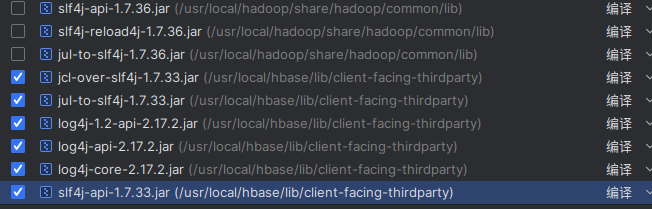
错误的原因是因为缺少slf4j日志组件jar包,三个jar包在/usr/local/hadoop/share/hadoop/common/lib。导入依赖如下:

导入后仍报错:
刚刚导入的是hadoop下的slf4j的jar包,换hbase的试试:
运行结果如下:

加入common-configuration2的jar包后:

运行成功:

###### 4.4.2 addRecord
package hbase1;
import org.apache.hadoop.conf.Configuration;
import org.apache.hadoop.hbase.HBaseConfiguration;
import org.apache.hadoop.hbase.TableName;
import org.apache.hadoop.hbase.client.*;
import java.io.IOException;
public class AddRecord {
public static Configuration configuration;
public static Connection connection;
public static Admin admin;
public static void addRecord(String tableName, String row,
String[] fields, String[] values) throws IOException {
init();
Table table = connection.getTable(TableName.valueOf(tableName));
for (int i = 0; i != fields.length; i++) {
Put put = new Put(row.getBytes());
String[] cols = fields[i].split(“:”);
put.addColumn(cols[0].getBytes(), cols[1].getBytes(),
values[i].getBytes());
table.put(put);
}
table.close();
close();
}
public static void init() {
configuration = HBaseConfiguration.create();
configuration.set(“hbase.rootdir”,
“hdfs://localhost:9000/hbase”);
try {
connection =
ConnectionFactory.createConnection(configuration);
admin = connection.getAdmin();
} catch (IOException e) {
e.printStackTrace();
}
}
public static void close() {
try {
if (admin != null) {
admin.close();
}
if (null != connection) {
connection.close();
}
} catch (IOException e) {
e.printStackTrace();
}
}
public static void main(String[] args) {
String[] fields = {“Score:Math”, “Score:Computer Science”,
“Score:English”};
String[] values = {“99”, “80”, “100”};
try {
addRecord(“person”, “Score”, fields, values);
} catch (IOException e) {
e.printStackTrace();
}
}
}
结果如下:已经插入了数据

###### 4.4.3 scanColumn
package EXP4;
import org.apache.hadoop.conf.Configuration;
import org.apache.hadoop.hbase.Cell;
import org.apache.hadoop.hbase.CellUtil;
import org.apache.hadoop.hbase.HBaseConfiguration;
import org.apache.hadoop.hbase.TableName;
import org.apache.hadoop.hbase.client.*;
import org.apache.hadoop.hbase.util.Bytes;
import java.io.IOException;
public class ScanColumn {
public static Configuration configuration;
public static Connection connection;
public static Admin admin;
public static void scanColumn(String tableName, String column)
throws IOException {
init();
Table table = connection.getTable(TableName.valueOf(tableName));
Scan scan = new Scan();
scan.addFamily(Bytes.toBytes(column));
ResultScanner scanner = table.getScanner(scan);
for (Result result = scanner.next(); result != null; result =
scanner.next()) {
showCell(result);
}
table.close();
close();
}
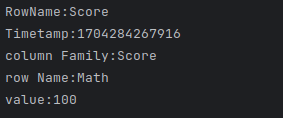
public static void showCell(Result result) {
Cell[] cells = result.rawCells();
for (Cell cell : cells) {
System.out.println(“RowName:” + new
String(CellUtil.cloneRow(cell)) + " ");
System.out.println(“Timetamp:” + cell.getTimestamp() + "
");
System.out.println(“column Family:” + new
String(CellUtil.cloneFamily(cell)) + " ");
System.out.println(“row Name:” + new
String(CellUtil.cloneQualifier(cell)) + " ");
System.out.println(“value:” + new
String(CellUtil.cloneValue(cell)) + " ");
}
}
public static void init() {
configuration = HBaseConfiguration.create();
configuration.set(“hbase.rootdir”,
“hdfs://localhost:9000/hbase”);
try {
connection =
ConnectionFactory.createConnection(configuration);
admin = connection.getAdmin();
} catch (IOException e) {
e.printStackTrace();
}
}
// 关闭连接
public static void close() {
try {
if (admin != null) {
admin.close();
}
if (null != connection) {
connection.close();
}
} catch (IOException e) {
e.printStackTrace();
}
}
public static void main(String[] args) {
try {
scanColumn(“person”, “Score”);
} catch (IOException e) {
e.printStackTrace();
}
}
}
结果如下:

###### 4.4.4 modifyData
package EXP4;
import org.apache.hadoop.conf.Configuration;
import org.apache.hadoop.hbase.Cell;
import org.apache.hadoop.hbase.HBaseConfiguration;
import org.apache.hadoop.hbase.TableName;
import org.apache.hadoop.hbase.client.*;
import java.io.IOException;
public class ModifyData {
public static long ts;
public static Configuration configuration;
public static Connection connection;
public static Admin admin;
public static void modifyData(String tableName, String row, String
column, String val) throws IOException {
init();
Table table = connection.getTable(TableName.valueOf(tableName));
Put put = new Put(row.getBytes());
Scan scan = new Scan();
ResultScanner resultScanner = table.getScanner(scan);
for (Result r : resultScanner) {
for (Cell cell : r.getColumnCells(row.getBytes(),
column.getBytes())) {
ts = cell.getTimestamp();
}
}
put.addColumn(row.getBytes(), column.getBytes(), ts,
val.getBytes());
table.put(put);
table.close();
close();
}
public static void init() {
configuration = HBaseConfiguration.create();
configuration.set(“hbase.rootdir”,
“hdfs://localhost:9000/hbase”);
try {
connection =
ConnectionFactory.createConnection(configuration);
admin = connection.getAdmin();
} catch (IOException e) {
e.printStackTrace();
}
}
public static void close() {
try {
if (admin != null) {
admin.close();
}
if (null != connection) {
connection.close();
}
} catch (IOException e) {
e.printStackTrace();
}
}
public static void main(String[] args) {
try {
modifyData(“person”, “Score”, “Math”, “100”);
} catch (IOException e) {
e.printStackTrace();
}
}
}
结果如下:已经修改
###### 4.4.5 deleteRow
package EXP4;
import org.apache.hadoop.conf.Configuration;
import org.apache.hadoop.hbase.Cell;
import org.apache.hadoop.hbase.HBaseConfiguration;
import org.apache.hadoop.hbase.TableName;
import org.apache.hadoop.hbase.client.*;
import org.apache.hadoop.hbase.util.Bytes;
import java.io.IOException;
public class DeleteRow {
public static long ts;
public static Configuration configuration;
public static Connection connection;
public static Admin admin;
public static void deleteRow(String tableName, String row) throws
IOException {
init();
Table table = connection.getTable(TableName.valueOf(tableName));
Delete delete=new Delete(row.getBytes());
table.delete(delete);
table.close();
close();
}
public static void init() {
configuration = HBaseConfiguration.create();
configuration.set(“hbase.rootdir”,
“hdfs://localhost:9000/hbase”);
try {
connection =
ConnectionFactory.createConnection(configuration);
admin = connection.getAdmin();
} catch (IOException e) {
e.printStackTrace();
}
}
public static void close() {
try {
if (admin != null) {
admin.close();
}
if (null != connection) {
connection.close();
}
} catch (IOException e) {
e.printStackTrace();
}
}
public static void main(String[] args) {
try {
deleteRow(“person”, “Score”);
} catch (IOException e) {
e.printStackTrace();
}
}
}
结果如下:

## 《大数据技术基础》实验报告5
#### 目的
#### 二、实验平台
操作系统:Linux。
Hadoop版本:2.7.3或以上版本。
JDK版本:1.7或以上版本。
Java IDE:Eclipse/IDEA。
#### 三、实验要求
(1)Redis数据库的安装,以及Redis数据的插入、取回和删除。https://www.redis.net.cn/tutorial/3501.html
(2)MongoDB数据库的安装,以及MongoDB文档的插入、查询、更新与删除。https://docs.mongoing.com/mongodb-crud-operations/delete-documents
#### 四、实验内容
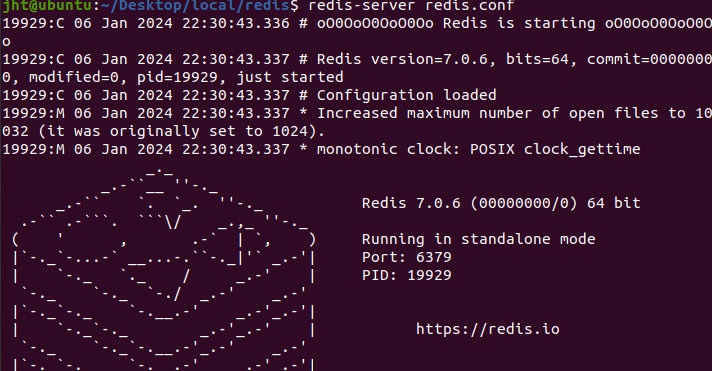
##### 4.1 安装redis
在镜像网站下载了redis-7.0.6.tar.gz,解压到/usr/local中,重命名为redis。

运行make命令,进行安装。
make
make install
redis-server redis.conf
##### 4.2 编程测试
添加依赖:
    <dependency>
        <groupId>org.apache.commons</groupId>
        <artifactId>commons-lang3</artifactId>
        <version>3.3.2</version>
    </dependency>
    <dependency>
        <groupId>redis.clients</groupId>
        <artifactId>jedis</artifactId>
        <version>3.3.0</version>
    </dependency>
使用如下代码测试Redis数据的插入、取回和删除:

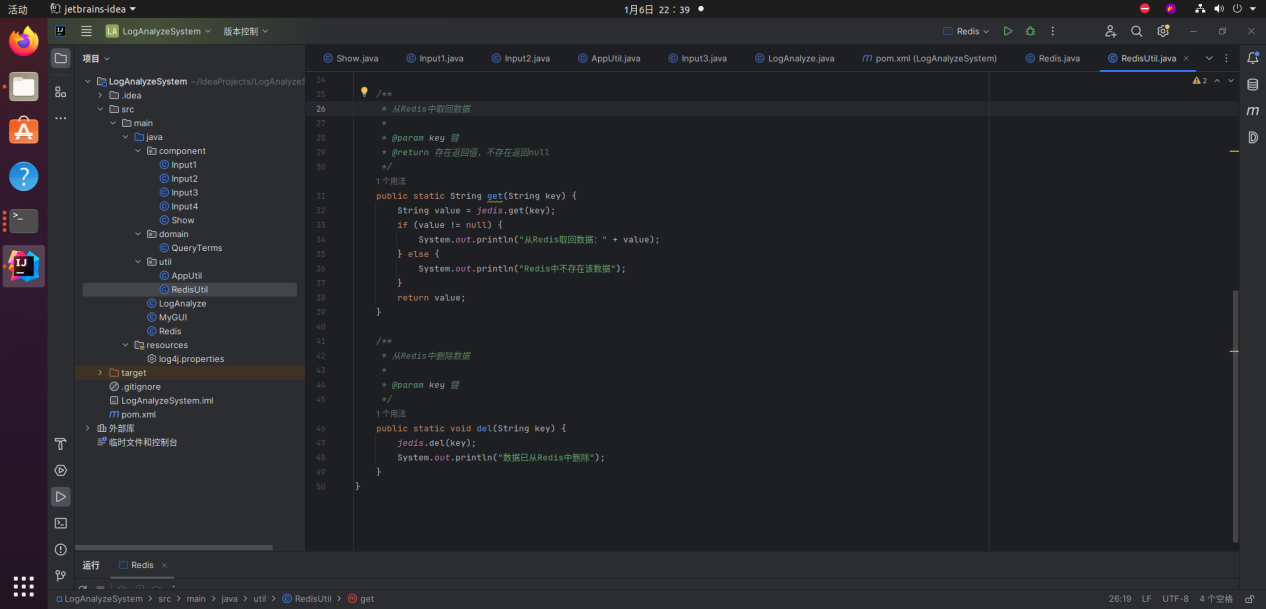

package util;
import redis.clients.jedis.Jedis;
public class RedisUtil {
private static Jedis jedis;
static {
jedis = new Jedis(“127.0.0.1”, 6379);
jedis.auth(“123456”);
}
/**
* 将数据存入Redis
*
* @param key 键
* @param value 值
*/
public static void set(String key, String value) {
jedis.set(key, value);
System.out.println(“数据已存入Redis”);
}
/**
* 从Redis中取回数据
*
* @param key 键
* @return 存在返回值,不存在返回null
*/
public static String get(String key) {
String value = jedis.get(key);
if (value != null) {
System.out.println(“从Redis取回数据:” + value);
} else {
System.out.println(“Redis中不存在该数据”);
}
return value;
}
/**
* 从Redis中删除数据
*
* @param key 键
*/
public static void del(String key) {
jedis.del(key);
System.out.println(“数据已从Redis中删除”);
}
}
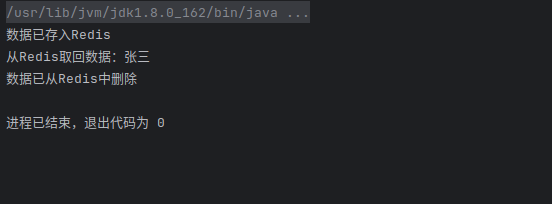
import util.RedisUtil;
import java.io.IOException;
public class Redis {
public static void main(String[] args) throws IOException {
// 插入数据
RedisUtil.set(“name”, “张三”);
// 取回数据
RedisUtil.get(“name”);
// 删除数据
RedisUtil.del(“name”);
}
}
##### 4.3 安装mongodb
下载了mongodb-linux-x86\_64-4.0.13.tgz,解压到/usr/local文件夹,并改名为mongodb。
tar -zxvf mongodb-linux-x86_64-4.0.13.tgz -C /usr/local
在 mongodb 下创建 data 和 logs 目录
mkdir data
mkdir logs
touch /usr/local/mongodb/logs/mongodb.log
添加环境变量
gedit ~/.bashrc
export PATH=$PATH:/usr/local/mongodb/bin
source ~/.bashrc
在/usr/local/mongodb/bin中建立mongodb.conf文件,并添加一下常用配置:
#指定数据库路径
dbpath=/usr/local/mongodb/data
#指定MongoDB日志文件
logpath=/usr/local/mongodb/logs/mongodb.log
使用追加的方式写日志
logappend=true
#端口号
port=27017
#方便外网访问
bind_ip=0.0.0.0
fork=true # 以守护进程的方式运行MongoDB,创建服务器进程
#auth=true #启用用户验证
#bind_ip=0.0.0.0
#绑定服务IP,若绑定127.0.0.1,则只能本机访问,不指定则默认本地所有IP
##### 4.4 测试
mongo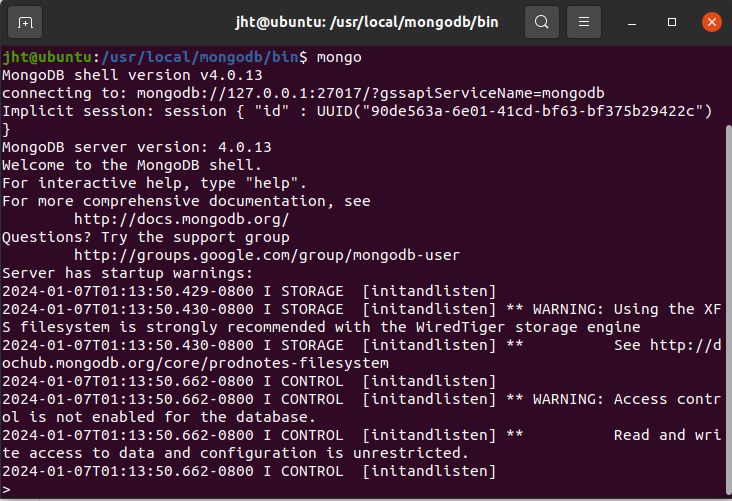
创建 MongoDB 数据库及管理员账号
use admin;
db.createUser({user:‘root’, pwd:‘123456’, roles:[{role:‘root’,
db:‘admin’}]});
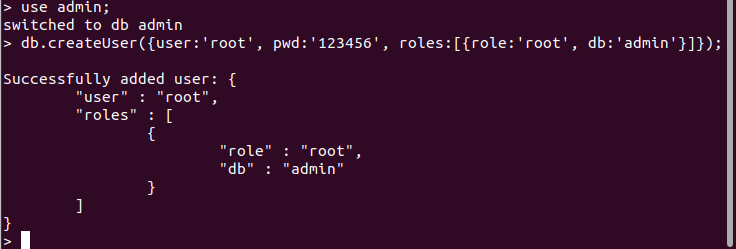
创建好账号后,可以选择打开 mongodb.conf 中的 auth=true 授权验证。
验证账号是否授权成功:
db.auth(“root”,“123456”)
如果返回 '1’表示验证成功, 如果是 ‘0’ 表示验证失败

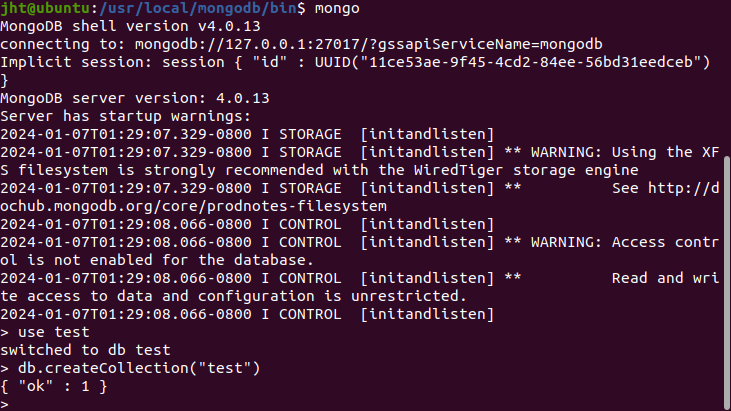
测试建立数据库和数据集
## 《大数据技术基础》实验报告6
#### 实验要求
* 完成SPARK的安装与启动
* 根据计算机安装的Hadoop版本,选择对应的spark版本下载并安装,安装和Hadoop一样,要实现三个节点主从分配。
* Spark安装后,需要先启动Hadoop,再启动spark。启动spark后,进入spark的bin文件夹下,执行命令
* ./run-example SparkPi 2>&1 | grep “Pi
is”,查看spark是否能输出Pi值,即可知安装与启动是否成功
#### 二、实验平台
操作系统:Linux。
Hadoop版本:2.7.3或以上版本。
JDK版本:1.7或以上版本。
Java IDE:Eclipse/IDEA。
#### 三、实验内容
启动hadoop:
ssh localhost

网上学习资料一大堆,但如果学到的知识不成体系,遇到问题时只是浅尝辄止,不再深入研究,那么很难做到真正的技术提升。
一个人可以走的很快,但一群人才能走的更远!不论你是正从事IT行业的老鸟或是对IT行业感兴趣的新人,都欢迎加入我们的的圈子(技术交流、学习资源、职场吐槽、大厂内推、面试辅导),让我们一起学习成长!
rt=27017
#方便外网访问
bind_ip=0.0.0.0
fork=true # 以守护进程的方式运行MongoDB,创建服务器进程
#auth=true #启用用户验证
#bind_ip=0.0.0.0
#绑定服务IP,若绑定127.0.0.1,则只能本机访问,不指定则默认本地所有IP
##### 4.4 测试
mongo
创建 MongoDB 数据库及管理员账号
use admin;
db.createUser({user:‘root’, pwd:‘123456’, roles:[{role:‘root’,
db:‘admin’}]});

创建好账号后,可以选择打开 mongodb.conf 中的 auth=true 授权验证。
验证账号是否授权成功:
db.auth(“root”,“123456”)
如果返回 '1’表示验证成功, 如果是 ‘0’ 表示验证失败

测试建立数据库和数据集

## 《大数据技术基础》实验报告6
#### 实验要求
* 完成SPARK的安装与启动
* 根据计算机安装的Hadoop版本,选择对应的spark版本下载并安装,安装和Hadoop一样,要实现三个节点主从分配。
* Spark安装后,需要先启动Hadoop,再启动spark。启动spark后,进入spark的bin文件夹下,执行命令
* ./run-example SparkPi 2>&1 | grep “Pi
is”,查看spark是否能输出Pi值,即可知安装与启动是否成功
#### 二、实验平台
操作系统:Linux。
Hadoop版本:2.7.3或以上版本。
JDK版本:1.7或以上版本。
Java IDE:Eclipse/IDEA。
#### 三、实验内容
启动hadoop:
ssh localhost
[外链图片转存中…(img-EPSqNPdp-1715231937214)]
[外链图片转存中…(img-HX0pFCnh-1715231937214)]
网上学习资料一大堆,但如果学到的知识不成体系,遇到问题时只是浅尝辄止,不再深入研究,那么很难做到真正的技术提升。
一个人可以走的很快,但一群人才能走的更远!不论你是正从事IT行业的老鸟或是对IT行业感兴趣的新人,都欢迎加入我们的的圈子(技术交流、学习资源、职场吐槽、大厂内推、面试辅导),让我们一起学习成长!

永洪科技,致力于打造全球领先的数据技术厂商,具备从数据应用方案咨询、BI、AIGC智能分析、数字孪生、数据资产、数据治理、数据实施的端到端大数据价值服务能力。
更多推荐


 5
5 0
0- 0


 已为社区贡献6条内容

所有评论(0)